Embedded Systems Electric Piano
Github Link: Check out the github repository for this project!
Collaborators: Charlotte Wong & Phuong Dao
Problem To Be Solved
I really wanted to learn piano, but I could not read sheet music. Then, I realized that there are many people out there that cannot afford expensive instruments nor the lessons required to become proficient in reading sheet music. Thus, I wanted to create a solution to this problem that was low-cost, power efficient, and an effective way to have fun playing a digital instrument.
Technical Approach
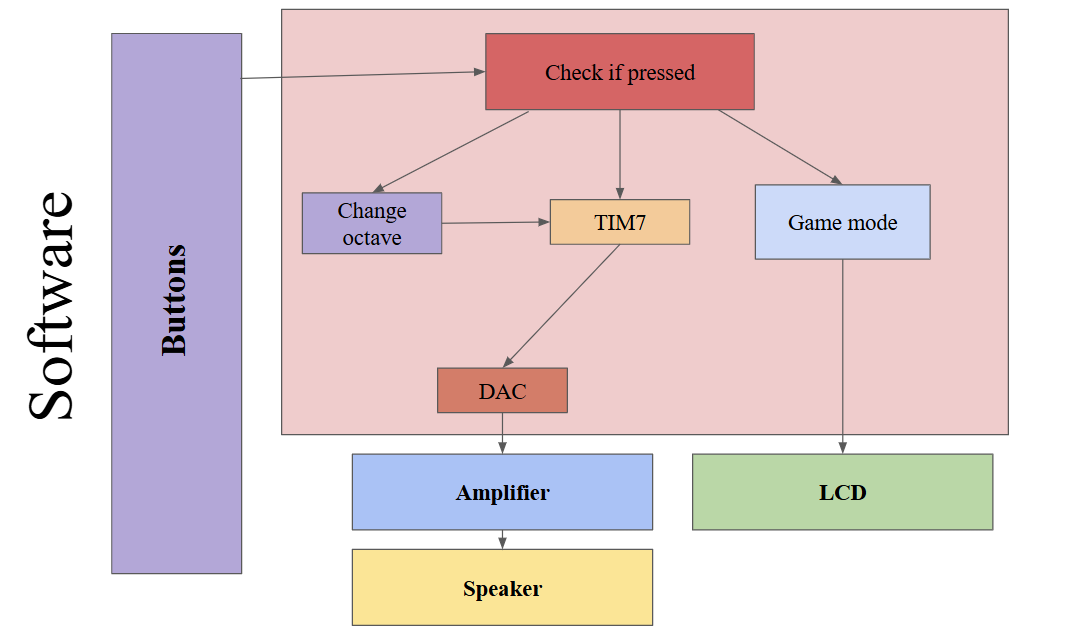
The image above displays the block diagram of the project, which shows how the project works and all its different modules interact with each other. My team and I wanted to make interacting with the piano as simple as possible. Therefore, we decided that the best option was to use push-buttons to represent the different notes on the piano. Furthermore, we wanted to add the ability to shift octaves since adding a set of buttons for each octave on the piano would have been unreasonable from a components point-of-view. Another button was added to add a mini-game component to the electric piano. It involved notes of a certain song being displayed, the user playing the notes, and then trying to guess the song.
At the very beginning of the project, we needed to decide whether or not to use the Nucleo-L432KC development board to generate the audio signals using its internal DAC(Digital-To-Analog Converter) without any external files or to record live piano notes. The issue was that the microcontroller development board did not have a lot of storage. Thus, storing multiple live audio files from a real piano would have been unreasonable. The storage capability of the development board would have only been enough to store a single audio file for a single note. Therefore, the team and I decided to use the 12-bit DAC built in on the Nucleo-L432KC to generate our own sine waves straight from the development board. Another challenge we had was deciding whether or not to use interrupt handlers to detect when buttons are pushed or to use constant polling. Ultimately, the team and I decided to use polling because the buttons were pressed frequently enough that polling would not unreasonable. A factor that also contributed to the decision of using polling was that it would have been very difficult to implement a different interrupt for each of the 9 buttons. Although it could have been done, the project needed to be done in a constrained time of 2 weeks in the middle of finals season. Thus, the complexity had to be the tradeoff to meet the deadline. Finally, the Nucleo-L432KC development board has an STM32-L432KC microcontroller unit integrated onto it. The reason we chose this microcontroller unit was because it was small, portable, low-power, and low-cost. It also has an on-board DAC and its clock rate was fast enough to produce all the frequencies we wanted for the piano notes.
Implementation
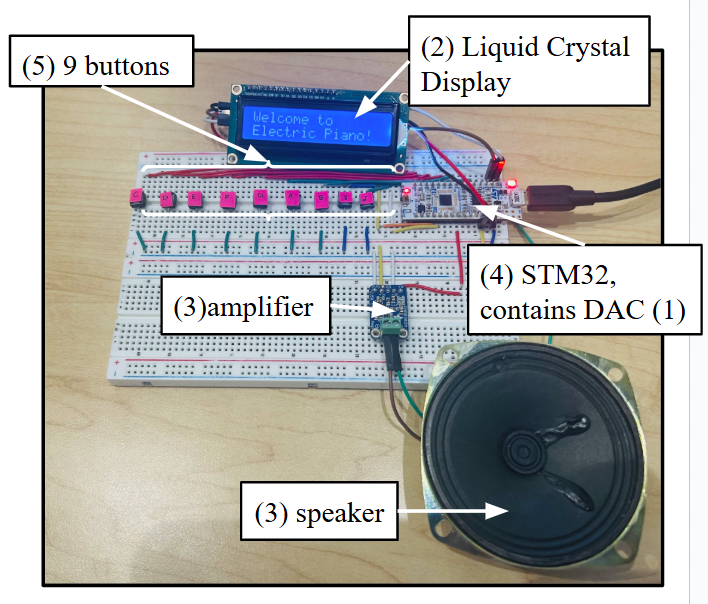
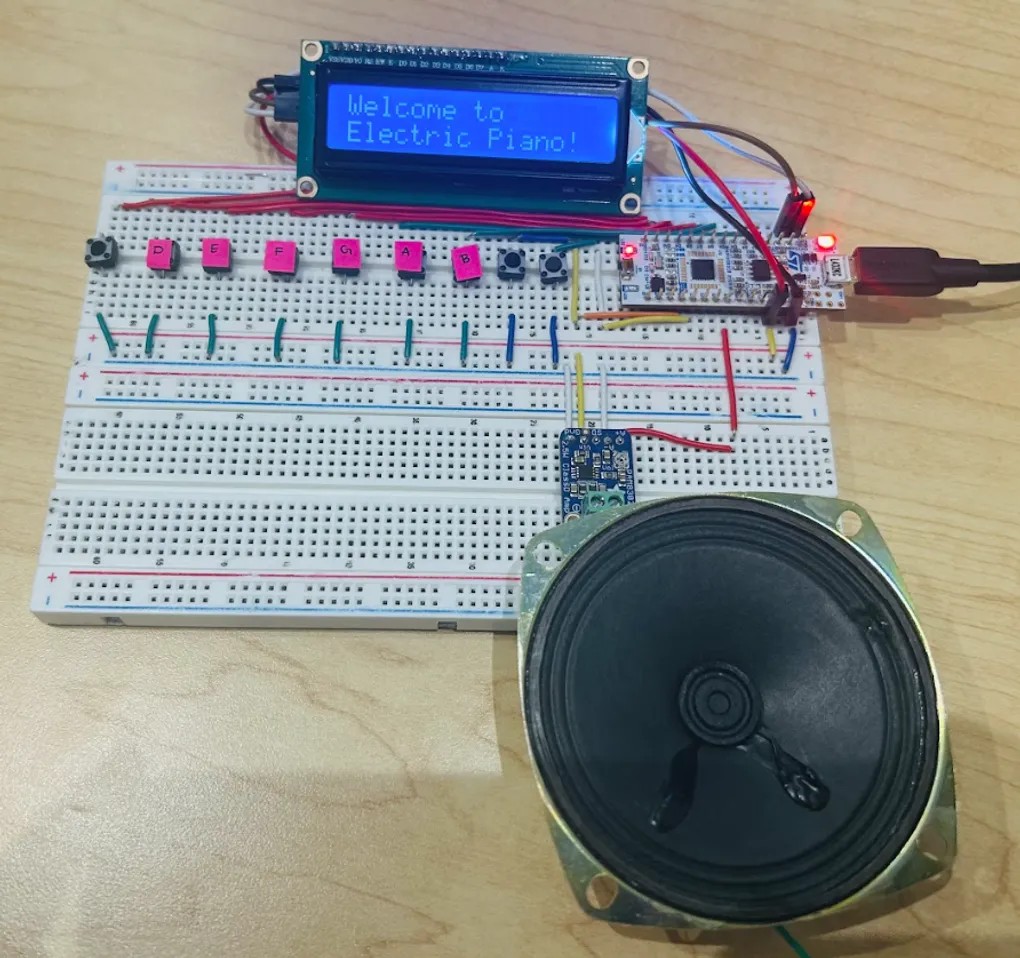
The electric piano was implemented using a Nucleo-L432KC development board, push-buttons, an LCD(Liquid Crystal Display), an adafruit PAM8302 audio amplifier, and a speaker. When we first built the project, we noticed that the audio produced by the speaker was barely audible. Thus, we decided to add the PAM8302 audio amplifier to boost the sound. Also, another issue that was encountered was the wiring of the breadboard. In the beginning, we did not use the flat wires and instead used jumper wires. We realized that users would not be able to reasonably press buttons to produce sound with so many wires blocking their path. Thus, we simplified the wiring by using flat wires.
My Contribution
Alongside helping plan, brainstorm, and debug parts of the project, I personally handled the implementation of the LCD onto the electric piano. The LCD was added to solve the problem of playing the piano for those that did not know how to read sheet music. Also, it offered a cheap alternative to buying an entire monitor or screen for the electric piano. The LCD used the serial communication protocol called I2C, so I had to enable all the pins and the internal hardware of the Nucleo-L432KC to enable it to communicate with the LCD through I2C. The LCD allowed for one to send 2 types of messages: data or command. The user first has to configure the LCD and initialize it before any data is transferred. Then, when I tried transferring data to the LCD for the first time, nothing appeared. I did some research online and discovered that even though the LCD was capable of displaying 16 ASCII characters represented by bytes, the data transfer method was more complex than simplying sending bytes. The LCD needed to receive 2 bytes from the MCU(microcontroller unit). For example, I have a byte of data I wanted to display. I would have to split the byte into 2 nibbles, which are half a byte each. Then, I would have to create 2 new bytes with the higher nibble (upper 4 bits) containing half of the original byte of data and the lower nibble (lower 4 bits) containing information about what type of data this was (command or data), whether the backlight was on, etc.
After I fixed that issue, letters were successfully appearing on the LCD display. However, the letters were wrong. For example, I sent the letter S to the LCD display, which is represented by the hexadecimal 0x53 in ASCII. However, the LCD display would show the number 5, which corresponded with the hexadecimal 0x35. Somehow the data was being reversed. I tried delaying the transmission of the 2nd byte to see if it solved the issue, which did not work. Then, I realized that I needed to send the bytes as a bus instead of individual bytes. This realization helped me write the code that fixed the LCD display and got it to work.
Results
Here’s a video demonstration of my project: